
My “Go To” Pro Tools Moves for Cutting Samples
As I have mentioned in previous posts, my beat making approach is similar to that of a video editor. I take the best clips and arrange them in the edit window to create music. Here are a few of the moves that I frequently use to splice and reorder my samples:
-

How to enable elastic audio for an audio track in Pro Tools
Timestretch tool (F6) on an elastic audio enabled track set to Polyphonic. This is my go to move for matching a sample to my desired tempo. I can import a sample and extract a 2 bar section from it and stretch it to match the session tempo so that when I make cuts on grid mode, I know that each part will be on beat. This is especially useful for sample flipping. Remember to hit the F6 key until the drag tool with the clock appears.

Using elastic audio to conform a sample to the Pro Tools session’s tempo.
- Tab To Transient (tab key) function. I use the tab key when I am trying to find the tempo of a song. Tab to the first beat or kick drum to move the cursor to the transient and hit B to splice. Then move the cursor close to the first kick drum of the next eight count (or beginning of bar 3), hit Tab then B to slice. Double click on the loop and hit CMD + I to identify beat. Type in 1/1/00 for start and 3/1/00 for end and hit enter. This will give you the tempo of the beat as well as set the session to that tempo. I also use tabbing to transients for splitting up drum loops. You can pull up a drum loop, tab to each drum hit and cut to create some one-shots.
- Region Grouping (ctrl + opt + G) and Ungrouping (ctrl + opt + U). A 2 bar sample loop can consist of many chopped up pieces, region grouping will pack it all up in one box that can easily be duplicated and copied. I do this for all of my drums. My hi-hats will sometimes reside on 3 separate tracks because I want each sound to be at different levels. To avoid confusion when trying to edit and duplicate, I will group all 3 layers into one group that can be looped.

Placing a 2 bar loop of a chopped up sample into a Region Group
Another benefit to packing regions into groups is to help remind me of changes in the beat. For Example my sample is a 2 bar loop but becomes a 4 bar loop for the chorus. I will pack the chorus loop into a 4 bar group so I know that they should not be separated. This comes in handy in case I need to clean up the original loop such as adjusting the timing or removing pops and clicks. I will edit the first region group and then copy and paste to replace the older version of the loop. Seeing that the chorus has a longer region group will remind me not to copy over it.
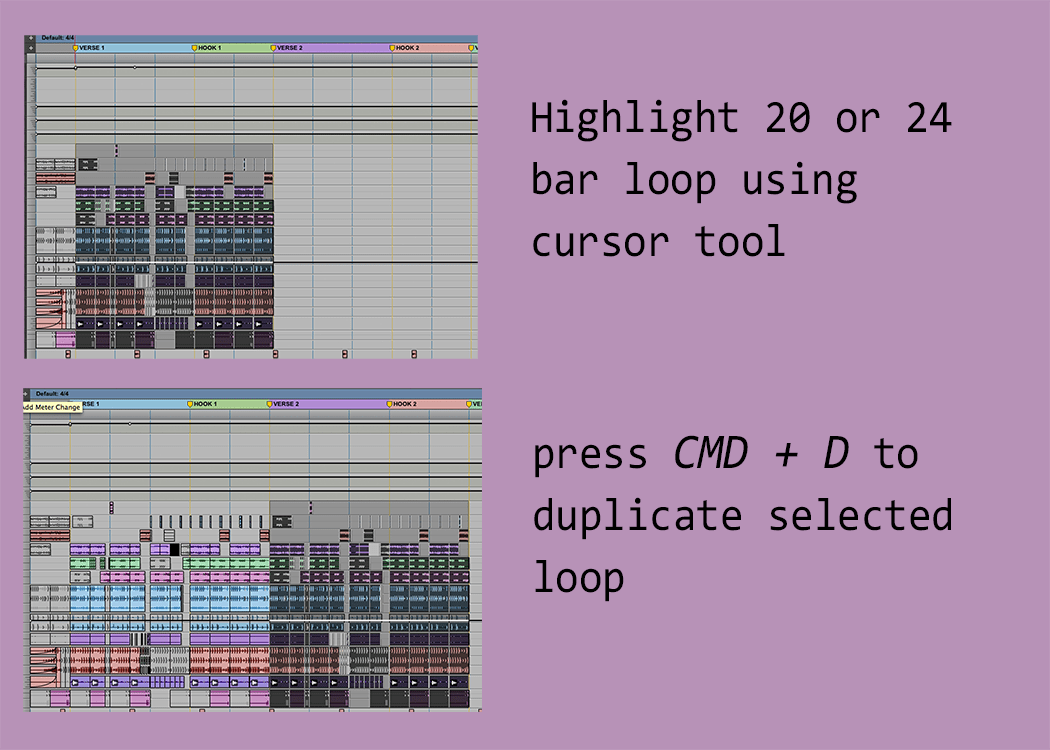
- Duplicating (CMD + D or opt + drag or C then V) the duplicate function can help you loop your region groups or quickly duplicate your entire 24 bar loop multiple times to make an entire beat. I like to use option drag to copy and place parts within a loop.

Using the Duplicate key command to loop your verse/chorus sequence.
I use this function when repeating a parts of a sample within a 2 bar loop as well.
- Fade in (D), crossfade (F) and Fade Out (G) this is helpful in minimizing unwanted pops and clicks in you chops. When sampling drums from drum loops I often use a fade out at the end of each drum hit. Without a fade, you can hear the decay of the drum sound getting cut off. Be sure to note that you cannot group audio regions on elastic audio enabled tracks when you add fades. I find this annoying but the workaround is to add your fades, highlight the fade, and hit shift + option + 3 to consolidate the fade region into a new waveform. From here you will be able to group the region.
- Pencil tool. Sometimes there will be a pop in the sample whether its from a crackle from the record or just a bad edit. You can zoom in until you see a pointy peak that looks out of place and you can actually use the pencil tool to draw the irregular waveform out.

Use the pencil tool to remove unwanted clicks/pops
Noticeable clicks and pops in your sampling sounds unprofessional. Sometimes you won’t hear it when the entire mix is playing but on a set of high end speakers those noises will be apparent.
- Mute/Unmute Region (M). If you have the playback loop going it helps to be able to quickly mute and unmute when auditioning different sounds and combinations. I will sometimes separate a portion of a region and mute it instead of deleting it. There have been instances when I have changed my mind and went back and unmuted regions.
- Cut (B) or cut everything to the left of cursor (A) or cut everything to the right of cursor (S). Right clicking and selecting the cut tool or even using CMD + E to chop is for amateurs. Here are some quick keys that require you to tap just one key. Or if you want to highlight part of a region and cut out whatever is not selected use the trim function: CMD + T.
- Melodyne Editor. Melodyne has many uses with regards to pitch shifting. For one of my beats I had a musician add keys and synth. For awhile we had a difficult time laying down anything that sounded good. Then the musician realized that he was able to play something decent when he held down the pitch wheel on the keyboard. He considered taping it down in place but I suggested that we adjust the pitch of the entire sample. I moved the waveform up and down the grid in Melodyne as he held down the C key on the keyboard until it sounded like we had a match. The result was this joint here:
- Grid mode (F4) and Slip mode (F2). I am constantly toggling between each mode when chopping up samples. When grouping regions I obviously want to be in grid mode to make sure my loops are exactly on beat and uniform. Using the grid also helps me lay of drums for a starting point. I will then switch over to slip mode to move the drums around or to rearrange the sample within a loop.

Use Zoom toggling to quickly zoom in and out of various areas of your Pro Tools sequence
- Toggle track height for selected regions (E) This allows me to navigate to the desired regions I would like to edit and quickly zoom into them. You can also select multiple tracks you would like to edit and zoom into only the selected regions.
- increase /decrease grid divisions (ctrl + option + Plus or Minus). Use this function while in grid mode. I can quickly set the grid to whole bars when I am ready to duplicate my 24 bar loop. When I need to cut out a snare at the end of the verse I can set the grid to quarter notes so I can quickly highlight the snare and delete it. When laying out hi-hats, I will split the grid into 32nds.


These are the Pro Tools moves that I find useful for cutting up samples and sequencing beats. Hopefully these tips can help you navigate more efficiently freeing up more time for creativity. Remember to memorize the quick keys and keep practicing. What moves or functions do you find helpful for your beat producing process?


